No matter how technology continues to shape our world, there are some parts of traditional dentistry that are still trusted by doctors worldwide. Among the most popular dental procedures are dentures, a part of traditional dental treatment and an essential part of restorative dentistry.
Dentures are a time-tested method to handle the replacement of missing teeth and tissue. The purpose of dentures is twofold: not only do they help those teeth that have been destroyed, but they also serve as a support system for the rest of your healthy, natural teeth.
At Goochland Dentistry, we offer both kinds of dentures: complete and partial. For both kinds, artificial teeth are affixed to flesh-colored bases that are made of plastic or acrylic that comfortably fit into your mouth. It’s merely a matter of which denture is the right one for you.
There are also two other options when it comes to complete dentures. You can choose either conventional or immediate complete dentures. Conventional dentures are placed 8 to 12 weeks after all the teeth in the mouth have been removed and the gum tissue has begun to heal. Immediate dentures, on the other hand, are made before the teeth are extracted and can be positioned as soon as the teeth are removed. These require a bit more patience, as repeated visits are often necessary to adjust your dentures to comfortably fit your mouth.
As your mouth heals, the tissues change, so your dentures may require several fittings to guarantee a correct fit. In some cases, patients can benefit from immediate dentures, but most often, they elect for conventional dentures.
Conventional dentures require all your natural teeth to be removed so a full set of replacement teeth can be custom-made. We begin with an appointment for your tooth extraction and then allow 4-6 weeks for a healing period. Once your gums have had the opportunity to heal, you will be ready for your dentures.
Digital technology has improved this procedure with the introduction of software that allows Dr. Murchie to custom-design, and manufacture your dentures made just for your mouth. Digital dentures have been proven to deliver a more solid structure, with a better fit and more durable material-all in addition to a faster and easier process.
Real Patients Real Results
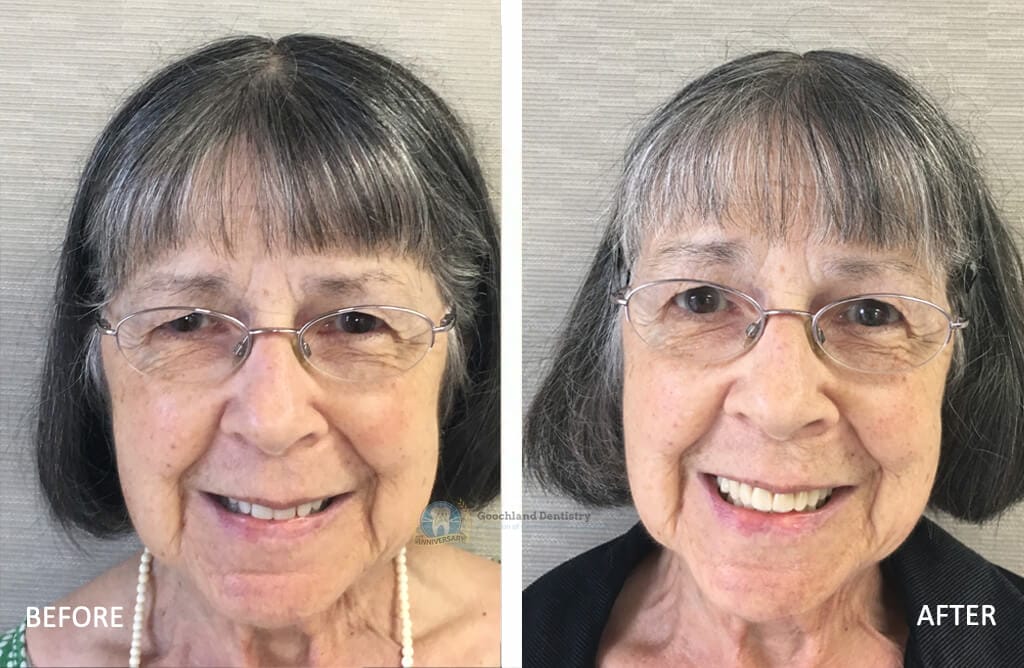
Before and After Results of Our Patients
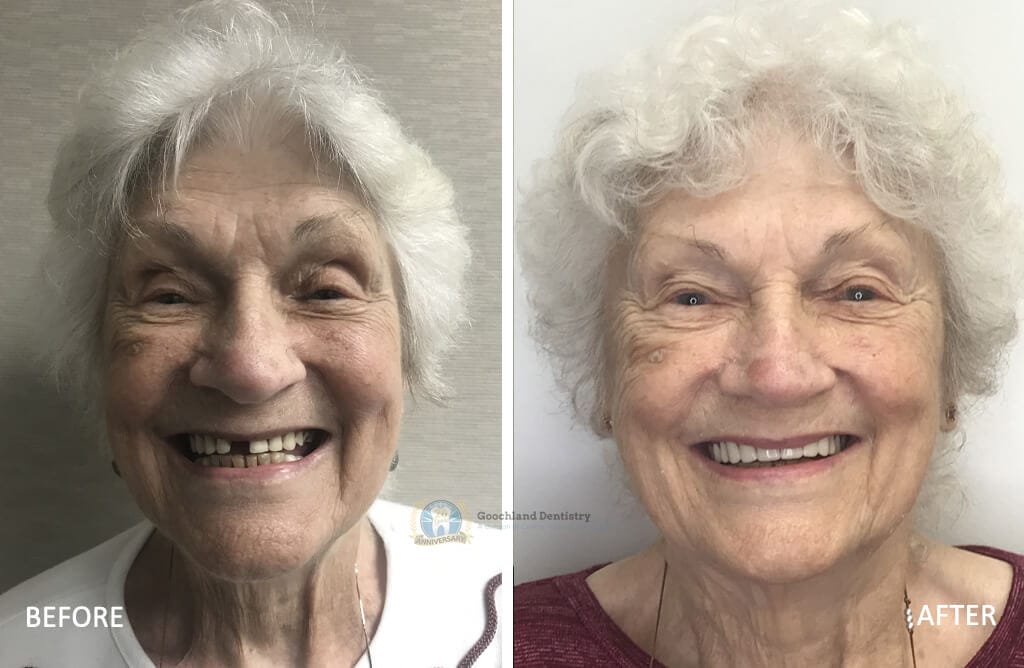
- Denture renewal. Mrs. H broke her denture and wanted to have a new denture.
- We custom designed and milled an upper denture that improved her smile, chewing and speech
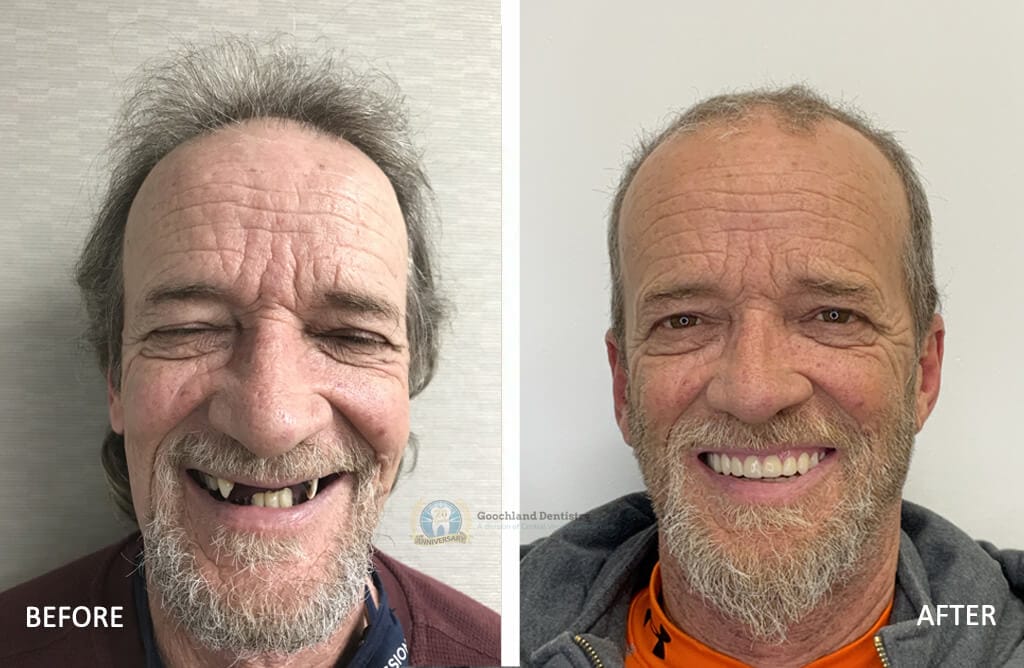
- Our patient was not happy with his smile and ability to eat his food.
- We discussed several different options and he desired to have top and bottom custom fit, digitally designed and very strong milled dentures. He was very pleased!
Also, because your information is stored digitally, we can repair or replace your denture easily.
After Dr. Murchie places your new dentures, we will take the time to thoroughly review and explain all instructions for use, hygiene, and care. Our team will make sure that when you leave our offices, you are confident and comfortable with your new dentures.
Your new dentures may require some minor adjustments as you get used to the fit and placement. Most patients adjust quickly and experience little to no trouble. However, we will happily continue to check, assess, and treat your dentures as needed over the coming years.
To learn more about dentures, give our patient support team a call to schedule an appointment!
How to Make a Denture Using Digital Design
The speaker discusses the process of making a digital denture. They send information to a laboratory where it is digitized and a plan is created for making the denture teeth. The speaker can view and manipulate the denture from different angles to make adjustments. Once everything is approved, the denture is milled by the laboratory.
Traditional Way Of Making Dentures - Part 1
Hey, this is Dr. Mechi. I’m going to giggle. We’re going to go over some steps. I’m sure everybody is realizing that they’ve never thought about how a denture is made, but this is kind of the first step. So what you do is you have a really nice impression. This is made out of a material at the laboratory, and then we take these impressions and this shows where all the this person’s lips and cheeks are, and that’s for the upper jaw. And this is the bottom jaw. This little space right here is where the tongue is, and this is what an impression is.
So after you’ve got this impression, and we’ve done that with our patient in our, what we call our dental operatory, then I actually send this to my laboratory. And what they do is they pour a stone model out of this. You pour some stone in this thing in the impression, and then that sets up. And then you have an exact model that is a very accurate duplication of what the person’s mouth looks like. You do the same thing on the bottom. So this goes in here, the lab sets that sets up in about an hour when you make the stone, and then you’ve got your next step. This is how you make the model.
So once we’ve got this model, this is this patient’s upper jaw, this is the bottom jaw. You have no idea how these are going to come together. You could put ’em in backwards, which would be like this. You could put ’em upside down, you could do all kinds of things. So I have to know how to put these teeth together. So there is close to what the patient has in their mouth. We make this thing called a record base. And this has got some little plastic, and then it’s got this little wax, what we call a wax rim that goes across here that snaps in. We try some things in our patient’s mouth. We mark where the middle of their face is, we mark where their lip and smile is, and then we mark where their canine teeth are. And that helps to identify some of the cosmetic facial structures are. And then this little piece of wax tells you how long to make the teeth.
Traditional Way Of Making Dentures - Part 2
Okay, so this is the next step of using that wax rim of making a denture. So our next step, we have to figure out how do we put the top and bottom teeth together. And we’ve got a same kind of wax little plate here that goes in and it’s got some notches in it here. And then the top has notches. And both of these wax rims have been in the patient’s mouth and we’ve had ’em practice moving. And then we’ve got these little things called bite registration. And these snap into place in the patient’s mouth, but they snap into place. So this snaps in here and this snaps in here. And then the top and bottom snap together. So I know that when I put this together, this person’s jaw is going to look like this. And we’ll show you the next step that involves another piece of material called an articulator.
This little machine is called an articulator. I’ll call him S hanau because that’s the name of this brand of articulator. But if you see these little balls right here, I can move these back and forth. And these have been figured out to be measured to an average size that matches with people’s faces. So if you look at it from the front, here’s one side of your jaw, here’s the other side. And I can move both of these around. And these enable us to mimic how someone’s jaw moves. And it’s kind of like a, I don’t know, kind of almost like a little robot that we can use why we’re not working with the patient. So once we got that articular, I kind of know what that is. How do we attach this denture and the model? The model and the rim to the articular. So there’s this thing called a face bow, and we actually make a recording in the patient’s mouth and this is screwed in here. And we open up this upper arm of the face bow, and that is put in there. And then I’m going to put some stone in between there and that keeps that in place. And we can see how that works.
Traditional Way Of Making Dentures - Part 3
So we’re going to take some of this stone. I’m going to mix some of that up. It’s not what you think it is, it’s just some little plaster. It’s actually pretty cool stuff that’s very accurate. Mix that up and I put a little dob of that plastic plaster right here that goes in here, and I take some and put it on the top of this little thing. Then we mash it down and then I put that in there and you can see how that holds everything together. So the next step, putting the denture together, we use these little things. These are actually bent paperclips and no, I’m not a nine inch nails fan. They just happen to look like that. And then we rest these little things here, and I grab some from Hobby Lobby or Ben Franklin, wherever you get craft stuff. This is just a glue gun and you put this on here, let this dry and this sticks everything together. Pretty cool process. Then I’m going to do the same thing on the other side, and then we’ll show you the next step. So we got everything glued together, we got it screwed back into the articulator. Now what I’m going to do is mix up some of that plaster again, and I’m going to take that plaster,
Going to put some of that plaster as I’m mixing it up here on top of this little model here. And then after I build this up into a nice little patty there, the little bit over here onto this side, I’m going to close this thing together here. So now you’ve got the top and bottom together, and then this sets up in about four to five minutes. And then we will show you the end product of after what all this looks like. So the stone is all set. We’ve got to take all this stuff apart. We’re just going to take off our little Zs off and there’s Zorro on that side for the Z. And then we take this off. Those are these little bite registration things. Then you can see how you put this together, and that is pretty close to about where this individual’s mouth is going to be. And then you can take, I can unscrew these little things back here and my laboratory technician can move the person’s mouth around. And this is a really close adaptation to where his mouth is. So that’s kind of the next step. Next time this is going to be a digital denture.


